• About

BIMmuse

~ A collection of thoughts on BIM for Structural Engineers

BIMmuse

Monthly Archives: February 2013

Sure, it looks good. But how’d you do it?

20 Wednesday Feb 2013

Posted by Kate in Standards

≈ 1 Comment

Tags

Coping, Detail Components, Revit, Standards

If you’ve been working in CAD or BIM for any length of time, you know there’s ALWAYS more than one way to accomplish whatever it is you’re trying to do. Sometimes it doesn’t matter which method you pick, such as dimensioning an object by selecting it or picking its endpoints (if you’ll excuse me the AutoCAD example). But sometimes it really does matter — especially to the next person who comes along and has to edit your model.

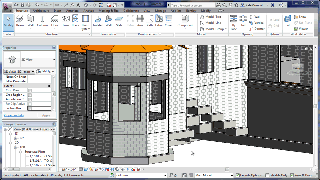
Let’s take beam copes. By default, using the “Apply Coping” tool, they look like this:

CopeDefault

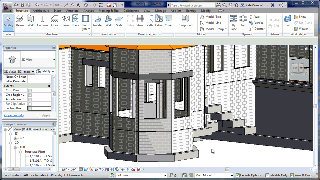
But at our office, we want them to look like this:CopeCorrect

Okay, now it looks right, but…how’d I do that? Off the top of my head, I came up with no fewer than 5 possible methods:

  1. Hide the beam and redraw it with detail lines.
  2. Use a masking region.
  3. Use a detail component.
  4. Use the “opening by face” tool.
  5. Use a void family.

Any of these methods will end up with an image that looks like the one above. But which one is best?

#1 will get you in trouble around here. We don’t hide real objects unless it’s absolutely necessary. If we did hide objects, how would we know when things have changed?

#2 is a little better, but it’s still tedious. You end up fussing with real lines vs. invisible ones, and you’ll probably end up with more shape handles than you really want to deal with.

#3 is the most efficient, if you have a good family set up and don’t need to show the effect of the coping in your 3D model. I’m usually fine with 2D-only coping, unless we’re going to cut a 3D section where showing the coping is important.

#4 and #5 both affect the actual 3D object, which can be handy if you need to show the coping in more than one view. Openings by face are quicker to create than voids, but they only affect one beam at a time. If a void is long enough, though, it could cut through a whole line of framing (after you used “cut geometry” on each beam). I’ve used both of these options; it really does seem to depend on the situation.

So there are pros and cons to each method for showing coped beams in sections. It’s just one scenario where the are multiple ways of creating the same look with vastly different effects on the model.

What do you think? Any options I missed?

(And for the record, in this example I used Opening By Face. But that was only because I’d already applied coping to create the first image…otherwise I’d probably have used a detail component and saved myself a step or two.)

When is a line not a line?

15 Friday Feb 2013

Posted by Kate in Basics

≈ Leave a comment

Tags

Components, Details, Objects, Revit, Styles

When is a line not a line? When it’s an object!

That sounds like either an annoying riddle or a really bad joke, but when it comes to details in Revit, it’s just the truth.

When we’re working with 2D views in Revit, they’re often a combination of live objects (e.g. beams/walls/floors), detail components (e.g. break lines, miscellaneous framing, rebar), and detail lines. I know there are some people out there who advocate against the use of detail lines at all, but we’re not able to do without them completely yet.

However, the distinction between detail lines & components confused me for a while. Specifically, why weren’t the line styles in my project the same ones I saw when editing a detail component?

DetailLines

DetailComponents

In hindsight, the pull-down headings (“Line Style” vs. “Subcategory”) should have tipped me off. But a lot of the names were the same, so I’d get confused when I’d see something in one place and not in the other.

DetailVGTurns out that Detail Lines — which only exist in projects — are considered “lines” and are controlled by that category in the Visibility Graphics dialog. “Lines” in Detail Components — which exist only in families — are considered “objects” and are controlled under the “Detail Items” category of Visibility Graphics.

In our office, there’s a lot of overlap between the styles in each category, which makes sense given that they both serve a similar purpose of adding 2D geometry to sections and details. But it also helps explain why I overlooked the differences!

I think the thing I find most confusing about Revit is the multiple terms for very similar objects. Things that might be synonyms in daily life have very different meanings inside Revit.

At any rate, that’s one minor mystery cleared up. On to the next!

Working with 3D Views

07 Thursday Feb 2013

Posted by Kate in Tips & Tricks

≈ Leave a comment

Tags

3D, Navigation, Views

This post is definitely back-to-basics, but considering how much of Revit’s value is in its 3D capabilities, I thought I’d share a few of the tips I’ve picked up lately for navigating in the third dimension.

#1: Set pivot for 3D orbit

If you hold down the Shift key and middle mouse button, you can move the mouse to orbit around your 3D model. However, the default orbit pivot is probably not exactly where you’d like it to be. In this case, if I’ve zoomed in on a corner of my building. When I try to orbit around the corner, it rapidly disappears from view.

orbit1

So instead, I’ll select an object near where I’d like my pivot point to be. Then when I use Shift-middle-pan, the view stays centered on my object.

orbit2

#2: Align 3D view to 2D view

This is possibly my favorite use of 3D views. If you right-click on the View Cube in a 3D view, one of the options is “Orient to View”. You can pick one of your existing floor plans, elevations, or sections (or 3D views, although that one seems a little silly to me) and instantly get a cropped, 3D view of that 2D area.

OrientToView1

You will probably need to orbit around it for the full 3D effect (possibly using tip #1), but it’s a great way to quickly clear your view of unnecessary geometry.

OrientToView2

Right now I’m mostly using this in working views, tracking down columns and floors and such, but I think it won’t be too much longer before these kinds of 3D sections are common sights in our design documents.

#3: Make objects transparent

Another way to clarify your view is by making certain objects or categories see-through. In steel-framed structures, I often get away without using this, but as soon as you add concrete or masonry walls, interior structure gets a lot harder to see! So I go to Visibility Graphics and override the Transparency to something greater than 0 — 50% seems to work nicely. If you take it all the way to 100%, your objects become completely clear, but as long as you still have “Show Edges” checked in your Graphic Display Options, you’ll still be able to tell they’re there. (I wouldn’t recommend using both 100% transparency and hidden edges.)

Below are images with walls at 0% and 50% transparency — it’d be clearer if it weren’t a CMU building (or if I turned the edges off), but you get the idea.

TransparentWalls1 TransparentWalls

I should point out that in 2012 and earlier, the Visibility Graphics dialog had two checkboxes for “Ghost Surfaces” and “Transparent”. In 2013, these have been merged into a single “Transparency” slider in the “Projection/Surface” category.


Keeping up with standards

04 Monday Feb 2013

Posted by Kate in Standards

≈ 2 Comments

Tags

Familes, Management, Revit, Standards

There’s an old joke in CAD Management circles that the wonderful thing about standards is that there are so many to choose from. (We laugh because it’s true.) For our firm, most of the time these are client-driven standards, which in turn are probably owner-driven. In these cases, we grumble, sigh, and then build templates to automate compliance as much as possible.

But what about internal standards? And, more specifically, what happens when they change?

I’m thinking about Revit families here — other kinds of standards will have to wait for another day.

To answer this problem, I went back to thinking about how we handled it in AutoCAD when a symbol changed or was added. Adding was easy. (“Here’s a new block.”) When we changed something, though, we had to think through how it would affect our projects in-progress. Was it worth updating them with the new block? (Maybe.) Was it worth updating our typical details? (Yes*.)

Taking this into Revit, I think the basics of the process are the same, but the challenge is multiplied due to the vast numbers of families and the various ways of accessing them.

But here’s how I think it can work:

  • If you need to update a family, go ahead and rename it. Don’t try to keep two versions hanging around. (At least not in the active folders. Backups are fine, of course.)
  • If needed, update your template so that new projects will use the new family. (This part’s kind of a no-brainer.)
  • Projects in-progress will continue to use the old family if it’s already been loaded. If you inadvertently load in the the new version, you should probably say “no” when asked, “Do you want to overwrite this family?”
  • If you need the new version in an existing project (and be honest, it’s probably why you updated the family in the first place), rename the existing family as zzOLD-family (or with your prefix/suffix of choice) and then load in the new family.

I’m in favor of the prefix method here because then all the zzOLD families will drop to the bottom of your project browser, where your users won’t be tempted to grab them when creating new instances. It’s also a pretty good visual clue if they do happen to select a superseded family.

Admittedly I haven’t put this into practice officially yet, but I think I’d like to. Am I missing anything?

(Back to the asterisk from above — updating typical details can be a huge chore. It needs to be done, though; otherwise you end up with old symbols perpetuating themselves through new projects. Maybe set aside a day a month for maintenance? I’ll have to think about that.)

Recent Posts

  • First theme of AU2016? Connectivity
  • BIM Essentials Tip #3
  • RTC and AU and BIMThoughts, oh my!
  • Revit 2017!
  • AU2015, Day 3

Archives

  • November 2016
  • July 2016
  • April 2016
  • December 2015
  • November 2015
  • October 2015
  • July 2015
  • June 2015
  • May 2014
  • September 2013
  • August 2013
  • July 2013
  • May 2013
  • April 2013
  • March 2013
  • February 2013
  • January 2013

Categories

  • Analysis
  • Announcements
  • Autodesk University
  • Basics
  • BIM Essentials
  • Framing
  • IT
  • Podcasts
  • RTC
  • Standards
  • Thoughts
  • Tips & Tricks
  • Uncategorized
  • Views

Enter your email address to receive notifications of new posts by email.

 Subscribe in a reader

Blog at WordPress.com.

Privacy & Cookies: This site uses cookies. By continuing to use this website, you agree to their use.
To find out more, including how to control cookies, see here: Cookie Policy
  • Follow Following
    • BIMmuse
    • Already have a WordPress.com account? Log in now.
    • BIMmuse
    • Customize
    • Follow Following
    • Sign up
    • Log in
    • Report this content
    • View site in Reader
    • Manage subscriptions
    • Collapse this bar
 

Loading Comments...