• About

BIMmuse

~ A collection of thoughts on BIM for Structural Engineers

BIMmuse

Tag Archives: Views

BIM Essentials Tip #2: Override View Templates

07 Tuesday Jul 2015

Posted by Kate in BIM Essentials

≈ 1 Comment

Tags

Tips & Tricks, view templates, Views

Even if you’re a big fan of View Templates (like I am), there comes a time when they’re in the way. Really, that time can be several times a day! Instead of turning off the template entirely–and then having to remember to put it back–use template overrides instead.

VToverride

Revit 2014 added this handy tool to the status bar and included two options: Enable Temporary View Properties and Temporarily Apply Template Properties. The first one just unlocks all the Visibility Graphics options for you to modify at will. The second lets you use the properties of a pre-existing template. For example, I have a “coordination” template that does nothing except turn on linked models in halftone–I use that one as a temporary override all the time.

And when you pick a template to use as an override, Revit remembers it! That template stays in your status bar menu for easy access later.

VTtemplate

When you’re done, simply “Restore View Properties”. The purple border (indicating an overridden template) will go away, your original template will be restored, and you’re back to business as usual.

BIM Essentials Tip #1

25 Thursday Jun 2015

Posted by Kate in BIM Essentials

≈ 2 Comments

Tags

Tips & Tricks, view templates, Views

The theme of this series of posts will be “bite-sized BIM” — easily digestible tips, tricks, and hints to help everyday Revit users be more productive.

Tip #1: View Templates

View Templates are a favorite tool of BIM Managers, because they provide control over the graphic settings for plotted views. Turn on or off a linked model, override the graphics for a model category, use filters to select specific objects — it’s all there. Also available are additional parameters for sorting view within the Project Browser, so you can keep your Working, Printed, and Coordination views separate.

1B   1A

Anything with its box checked in the right-hand image above cannot be modified in the regular Visibility Graphics dialog. So if you’re trying to change a graphics setting in your view and can’t…look for a view template! (But don’t change that template without talking to your model manager.)

If you enjoyed this first course, be sure to stay tuned…there’s plenty more where this came from!

Line Breaks in Revit Text

13 Tuesday May 2014

Posted by Kate in Tips & Tricks

≈ 7 Comments

Tags

formatting, Revit, schedules, text, Views

Today’s tip is about making new endings and new beginnings…for lines of text in Revit.

Did you know you can manually insert line breaks into view titles and schedule text fields? All it takes is Ctrl+Enter. Here’s a view of a schedule before and after I inserted a line break:

Image Image

It only looks like the second half of the line is gone–you can still access it with your arrow keys. And of course, you can see the entire text on the sheet, like this:

Image

A similar trick works for view titles whose contents don’t wrap nicely in the default field width. The only thing to remember is that you have to use Ctrl+Enter in the Title on Sheet field, NOT the View Name field. Before & after:

Image

Image

Thanks to this feature, you don’t have to worry so much about the length of text fields in titles — just make them as long as possible and add line breaks later.

Working vs. Sheet views

09 Thursday May 2013

Posted by Kate in Basics, Thoughts, Views

≈ 9 Comments

Tags

Process, Revit, Views, Workflow

When I first came back to working in Revit, I wasn’t convinced of the need to separate “working” views from “plotting” views. I’d never used them in AutoCAD, why start now? Can’t you just hide stuff you don’t need?

Gotta say, though, I became a fan pretty quickly. What changed my mind?

Working Sections 

When you’re working in 3D, a 2D view doesn’t always tell the whole story. (Or even half the story.) Want to see what’s really going on in your plan? Cut a section! Didn’t quite answer the question? Cut another section! Before you know it, your view is chock full of section cuts that you don’t actually need as part of your set.

WorkingView

Rather than letting section cuts clutter up your views, at our office we change them to a “working section” type and use a filter to turn them off in plotted views. We’ve found it helps eliminate confusion between what’s a “real” section and what’s not.

PlottingSection

“Real” (a.k.a. plotting) section

WorkingSection

“Working” section

Temporary Annotations 

I was modeling an existing structure the other day, and I needed to keep track of the top of caisson elevations. The easiest way to do this was to tag them all with spot elevations — but I did not want that information on the actual plan. Instead, I hopped over into the working view and tagged away.

WorkingView2

They didn’t have to look pretty, because they’ll never appear on paper. I like to think of working views as the digital equivalent of scratch paper. You can scribble all you want, knowing you won’t mess up your sheet. And if you decide later that you do need some of those annotations or sections on the plotting sheet, you can easily copy the annotations or change the section back to a regular type.

Watch out for real objects

The one caveat I would give for working views is that if you change something real, like a wall or a door, you’d better go back and check that in your plotting view to make sure it still looks the way you want it to. Real annotations such as dimensions and spot elevations should follow their hosts, but detail components might not and text notes definitely won’t.

Working with 3D Views

07 Thursday Feb 2013

Posted by Kate in Tips & Tricks

≈ Leave a comment

Tags

3D, Navigation, Views

This post is definitely back-to-basics, but considering how much of Revit’s value is in its 3D capabilities, I thought I’d share a few of the tips I’ve picked up lately for navigating in the third dimension.

#1: Set pivot for 3D orbit

If you hold down the Shift key and middle mouse button, you can move the mouse to orbit around your 3D model. However, the default orbit pivot is probably not exactly where you’d like it to be. In this case, if I’ve zoomed in on a corner of my building. When I try to orbit around the corner, it rapidly disappears from view.

orbit1

So instead, I’ll select an object near where I’d like my pivot point to be. Then when I use Shift-middle-pan, the view stays centered on my object.

orbit2

#2: Align 3D view to 2D view

This is possibly my favorite use of 3D views. If you right-click on the View Cube in a 3D view, one of the options is “Orient to View”. You can pick one of your existing floor plans, elevations, or sections (or 3D views, although that one seems a little silly to me) and instantly get a cropped, 3D view of that 2D area.

OrientToView1

You will probably need to orbit around it for the full 3D effect (possibly using tip #1), but it’s a great way to quickly clear your view of unnecessary geometry.

OrientToView2

Right now I’m mostly using this in working views, tracking down columns and floors and such, but I think it won’t be too much longer before these kinds of 3D sections are common sights in our design documents.

#3: Make objects transparent

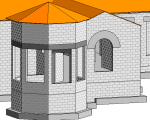
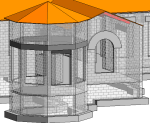
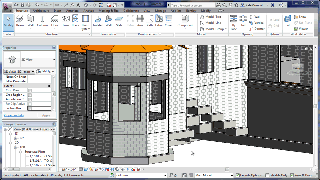
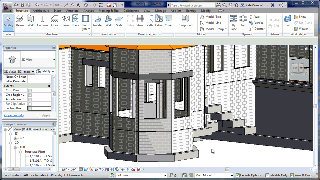
Another way to clarify your view is by making certain objects or categories see-through. In steel-framed structures, I often get away without using this, but as soon as you add concrete or masonry walls, interior structure gets a lot harder to see! So I go to Visibility Graphics and override the Transparency to something greater than 0 — 50% seems to work nicely. If you take it all the way to 100%, your objects become completely clear, but as long as you still have “Show Edges” checked in your Graphic Display Options, you’ll still be able to tell they’re there. (I wouldn’t recommend using both 100% transparency and hidden edges.)

Below are images with walls at 0% and 50% transparency — it’d be clearer if it weren’t a CMU building (or if I turned the edges off), but you get the idea.

TransparentWalls1 TransparentWalls

I should point out that in 2012 and earlier, the Visibility Graphics dialog had two checkboxes for “Ghost Surfaces” and “Transparent”. In 2013, these have been merged into a single “Transparency” slider in the “Projection/Surface” category.


Recent Posts

  • First theme of AU2016? Connectivity
  • BIM Essentials Tip #3
  • RTC and AU and BIMThoughts, oh my!
  • Revit 2017!
  • AU2015, Day 3

Archives

  • November 2016
  • July 2016
  • April 2016
  • December 2015
  • November 2015
  • October 2015
  • July 2015
  • June 2015
  • May 2014
  • September 2013
  • August 2013
  • July 2013
  • May 2013
  • April 2013
  • March 2013
  • February 2013
  • January 2013

Categories

  • Analysis
  • Announcements
  • Autodesk University
  • Basics
  • BIM Essentials
  • Framing
  • IT
  • Podcasts
  • RTC
  • Standards
  • Thoughts
  • Tips & Tricks
  • Uncategorized
  • Views

Enter your email address to receive notifications of new posts by email.

 Subscribe in a reader

Create a free website or blog at WordPress.com.

Privacy & Cookies: This site uses cookies. By continuing to use this website, you agree to their use.
To find out more, including how to control cookies, see here: Cookie Policy
  • Follow Following
    • BIMmuse
    • Already have a WordPress.com account? Log in now.
    • BIMmuse
    • Customize
    • Follow Following
    • Sign up
    • Log in
    • Report this content
    • View site in Reader
    • Manage subscriptions
    • Collapse this bar
 

Loading Comments...