• About

BIMmuse

~ A collection of thoughts on BIM for Structural Engineers

BIMmuse

Category Archives: Tips & Tricks

BIM Essentials Tip #3

09 Wednesday Nov 2016

Posted by Kate in BIM Essentials, Tips & Tricks

≈ 1 Comment

Tags

Viewer

Okay, seriously, who’s responsible for the time machine? I swear I just got back from RTC, and now it’s almost time for AU 2016. Some of this is probably due to the fact that, for the first time since I’ve been attending AU, it’s before Thanksgiving. The rest is because life and work have been running non-stop all year…and I don’t think it’s about to change! Better busy than bored, right?

Before I send a lot of visionary posts at you next week, with all the big ideas I’m sure we’ll hear at AU, here’s another small-but-important entry in the BIM Essentials series.

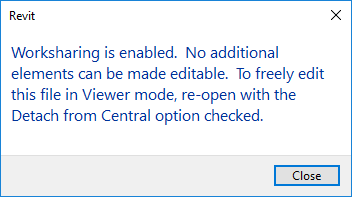
If you’re opening a workshared model with Revit Viewer, use Detach from Central.

At first glance, this sounds redundant. Why would you have to detach your model, when you can’t save your changes anyway?

As a reminder:

Viewer mode allows all functionality of Revit, except the following: save or save as in all cases; exporting or publishing modified projects; exporting or publishing any projects to a format containing model data that can be modified; or printing projects after changes are made.

If all you want to do is look at things, you don’t have to detach. But if you try to change something–cut a new section, rotate a 3D view, change Visibility Graphic overrides–while in Viewer mode, Revit will check back with the central model for permission first. And it won’t get it–because you’re in the viewer mode!

CentralModelInaccessible.png

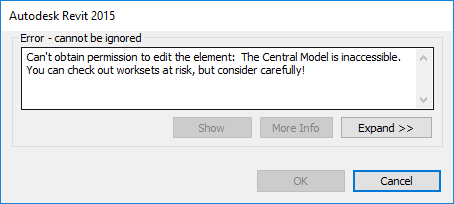
Detaching the model means it won’t try to check out objects, and won’t trigger that error.

Revit Viewer does try to warn you about that when you open a model, but we know not everybody reads every warning…

viewerwarning

Side note: Even if you do detach, if you have linked models you’ll still get this warning. The dialog won’t tell you that it’s related to the link, but it is.

Maybe some of you have your own dedicated Revit licenses, so you don’t need to worry about this. But if you use network licenses (or if you have friends who do), and you use the Viewer when you don’t want to take up a license, keep this tip in mind!

Line Breaks in Revit Text

13 Tuesday May 2014

Posted by Kate in Tips & Tricks

≈ 7 Comments

Tags

formatting, Revit, schedules, text, Views

Today’s tip is about making new endings and new beginnings…for lines of text in Revit.

Did you know you can manually insert line breaks into view titles and schedule text fields? All it takes is Ctrl+Enter. Here’s a view of a schedule before and after I inserted a line break:

Image Image

It only looks like the second half of the line is gone–you can still access it with your arrow keys. And of course, you can see the entire text on the sheet, like this:

Image

A similar trick works for view titles whose contents don’t wrap nicely in the default field width. The only thing to remember is that you have to use Ctrl+Enter in the Title on Sheet field, NOT the View Name field. Before & after:

Image

Image

Thanks to this feature, you don’t have to worry so much about the length of text fields in titles — just make them as long as possible and add line breaks later.

Insert screenshot in MS Office products

11 Thursday Jul 2013

Posted by Kate in Tips & Tricks

≈ Leave a comment

Tags

Images, Office, Screenshots

Okay, so this is not really BIM-related at all, but I haven’t posted here in over two months (sometimes life gets in the way of blogging) and when I found this I just had to share it. And if any of you have to create presentations, write training materials, or just put a lot of images in emails, you’ll like it as much as I do.

Here it is: Open up just about any Microsoft Office 2010 product (Word, Excel, Outlook, PowerPoint) and check out the Insert tab.

InsertScreenshot

Did anyone else miss the fact that there’s a screenshot option right in plain view? I guess my gaze usually stops on “Picture.” And to be fair, if your window is small enough the icon may get collapsed into the mini-version:

InsertScreenshotMini

Click on it, and you’ll get images of every open program you have. Pick one to drop in a full-size image of that window, or choose the “Screen Clipping” option to define your own area. (Note that the current program will minimize while you take your clipping.)

Is that cool or what?

Drag Listening Dimensions

29 Monday Apr 2013

Posted by Kate in Tips & Tricks

≈ Leave a comment

Tags

Beams, dimensions, modify, Revit

If you’ve used Revit at all, I’m sure you know what a listening dimension is, even if you’ve never heard the term before. They’re the temporary dimensions that show up when you select an object.

Listening1

They’re GREAT to have — I use them all the time when I know what the distance should be between two points or objects.

But the listening dimensions don’t always show up where you want them. In the image above, maybe I need to set the distance from the selected beam to grid 6.

Before I learned the trick I’m going to share with you, I would have added a dimension from the the beam to the grid, changed my measurement, and deleted the dimension. But no longer!

Instead, I learned (I forget where, sorry) that you can just adjust the listening dimension. Grab the blue dot (the tooltip will say “move witness line” and drag it to your preferred reference.

Listening2

Voilà!

And what’s more, this relocation is sticky — the listening dimension will appear in the same (new) place the next time you select that object.

Quick Rotate Objects

01 Monday Apr 2013

Posted by Kate in Basics, Tips & Tricks

≈ Leave a comment

Tags

Columns, Revit, Rotate, Tips & Tricks

When you’re inserting objects or components into a Revit view, you may have noticed the “Rotate after placement” checkbox below the ribbon.QuickRotate1

It’s handy, I suppose, but personally, I haven’t used it since I discovered the quick-and-easy way to rotate objects before you place them: with the space bar.

By default, pressing the space bar before you place an object rotates it 90 degrees.

QuickRotate2 QuickRotate3

But if you hover over an existing object first, your new component will rotate to match its alignment.

QuickRotate4 QuickRotate5 QuickRotate6

I use this ALL the time for placing breaklines along braces and sloped beams, or to align columns with non-orthogonal grids.

Just a quick tip to tide you over while we wait for Revit 2014 to appear…

Z-direction vs. Start & End offsets

25 Monday Mar 2013

Posted by Kate in Analysis, Framing, Tips & Tricks

≈ Leave a comment

Tags

Analysis, Beams, Revit, RISA

When you’re modeling structural framing in Revit, you often can just assign it to a level or reference plane to set its elevation.BeamOffset1

But sometimes you need to move a beam up or down — maybe to accommodate a slab step, architectural element, or other framing condition.

BeamOffset2

There are (at least) two ways to achieve the above image.

The first is with the z-Direction Justification and Offset. If you change Justification to “other”, you can then specify a single value to offset the beam up or down.

The second is with the Start and End Level Offsets. You can use these to give the two ends of the beam different elevations.

Which to choose? Well, it depends. Here’s what you need to know:

z-Direction Justification/Offset

  • The analytical line for a beam adjusted in the z-Direction stays put on the original reference level or work plane. This might be what you want to have happen, if you’re going to be exporting your analytical model to a program like RISA, or it might not. You’ll have to decide.BeamOffset3
  • You can only set one value, so it’s no good for sloped beams.
  • The z-Direction is relative to the beam, not the project. This means that if you have a beam with a rotated cross section, z-Direction offsets might not give you the result you’re looking for.BeamOffset4

Start & End Level Offsets

  • With this method, the analytical line follows your beam. Again, this may or may not create the desired effect with your analysis software.BeamOffset5
  • Each end can have a different offset, so you can create sloped framing.
  • HOWEVER, setting a start or end level offset AUTOMATICALLY detaches your framing from its work plane, and as far as I know you can’t get it back, even if the effect of the offsets keeps your framing parallel to its original plane.
  • Start/end offsets are relative to the level, so rotating your section keeps it more or less where it started. (Laterally, at any rate.)BeamOffset6

Combined Methods

  • You can actually use both methods at the same time for even more control over the location of your framing. Here’s the beam above with Start, End, AND z-Direction offsets.

 BeamOffset7

Working with 3D Views

07 Thursday Feb 2013

Posted by Kate in Tips & Tricks

≈ Leave a comment

Tags

3D, Navigation, Views

This post is definitely back-to-basics, but considering how much of Revit’s value is in its 3D capabilities, I thought I’d share a few of the tips I’ve picked up lately for navigating in the third dimension.

#1: Set pivot for 3D orbit

If you hold down the Shift key and middle mouse button, you can move the mouse to orbit around your 3D model. However, the default orbit pivot is probably not exactly where you’d like it to be. In this case, if I’ve zoomed in on a corner of my building. When I try to orbit around the corner, it rapidly disappears from view.

orbit1

So instead, I’ll select an object near where I’d like my pivot point to be. Then when I use Shift-middle-pan, the view stays centered on my object.

orbit2

#2: Align 3D view to 2D view

This is possibly my favorite use of 3D views. If you right-click on the View Cube in a 3D view, one of the options is “Orient to View”. You can pick one of your existing floor plans, elevations, or sections (or 3D views, although that one seems a little silly to me) and instantly get a cropped, 3D view of that 2D area.

OrientToView1

You will probably need to orbit around it for the full 3D effect (possibly using tip #1), but it’s a great way to quickly clear your view of unnecessary geometry.

OrientToView2

Right now I’m mostly using this in working views, tracking down columns and floors and such, but I think it won’t be too much longer before these kinds of 3D sections are common sights in our design documents.

#3: Make objects transparent

Another way to clarify your view is by making certain objects or categories see-through. In steel-framed structures, I often get away without using this, but as soon as you add concrete or masonry walls, interior structure gets a lot harder to see! So I go to Visibility Graphics and override the Transparency to something greater than 0 — 50% seems to work nicely. If you take it all the way to 100%, your objects become completely clear, but as long as you still have “Show Edges” checked in your Graphic Display Options, you’ll still be able to tell they’re there. (I wouldn’t recommend using both 100% transparency and hidden edges.)

Below are images with walls at 0% and 50% transparency — it’d be clearer if it weren’t a CMU building (or if I turned the edges off), but you get the idea.

TransparentWalls1 TransparentWalls

I should point out that in 2012 and earlier, the Visibility Graphics dialog had two checkboxes for “Ghost Surfaces” and “Transparent”. In 2013, these have been merged into a single “Transparency” slider in the “Projection/Surface” category.


Recent Posts

  • First theme of AU2016? Connectivity
  • BIM Essentials Tip #3
  • RTC and AU and BIMThoughts, oh my!
  • Revit 2017!
  • AU2015, Day 3

Archives

  • November 2016
  • July 2016
  • April 2016
  • December 2015
  • November 2015
  • October 2015
  • July 2015
  • June 2015
  • May 2014
  • September 2013
  • August 2013
  • July 2013
  • May 2013
  • April 2013
  • March 2013
  • February 2013
  • January 2013

Categories

  • Analysis
  • Announcements
  • Autodesk University
  • Basics
  • BIM Essentials
  • Framing
  • IT
  • Podcasts
  • RTC
  • Standards
  • Thoughts
  • Tips & Tricks
  • Uncategorized
  • Views

Enter your email address to receive notifications of new posts by email.

 Subscribe in a reader

Blog at WordPress.com.

Privacy & Cookies: This site uses cookies. By continuing to use this website, you agree to their use.
To find out more, including how to control cookies, see here: Cookie Policy
  • Follow Following
    • BIMmuse
    • Already have a WordPress.com account? Log in now.
    • BIMmuse
    • Customize
    • Follow Following
    • Sign up
    • Log in
    • Report this content
    • View site in Reader
    • Manage subscriptions
    • Collapse this bar
 

Loading Comments...