• About

BIMmuse

~ A collection of thoughts on BIM for Structural Engineers

BIMmuse

Category Archives: Basics

Working vs. Sheet views

09 Thursday May 2013

Posted by Kate in Basics, Thoughts, Views

≈ 9 Comments

Tags

Process, Revit, Views, Workflow

When I first came back to working in Revit, I wasn’t convinced of the need to separate “working” views from “plotting” views. I’d never used them in AutoCAD, why start now? Can’t you just hide stuff you don’t need?

Gotta say, though, I became a fan pretty quickly. What changed my mind?

Working Sections 

When you’re working in 3D, a 2D view doesn’t always tell the whole story. (Or even half the story.) Want to see what’s really going on in your plan? Cut a section! Didn’t quite answer the question? Cut another section! Before you know it, your view is chock full of section cuts that you don’t actually need as part of your set.

WorkingView

Rather than letting section cuts clutter up your views, at our office we change them to a “working section” type and use a filter to turn them off in plotted views. We’ve found it helps eliminate confusion between what’s a “real” section and what’s not.

PlottingSection

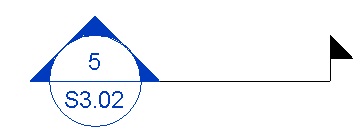
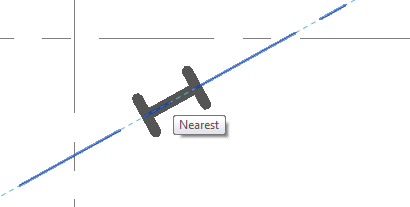
“Real” (a.k.a. plotting) section

WorkingSection

“Working” section

Temporary Annotations 

I was modeling an existing structure the other day, and I needed to keep track of the top of caisson elevations. The easiest way to do this was to tag them all with spot elevations — but I did not want that information on the actual plan. Instead, I hopped over into the working view and tagged away.

WorkingView2

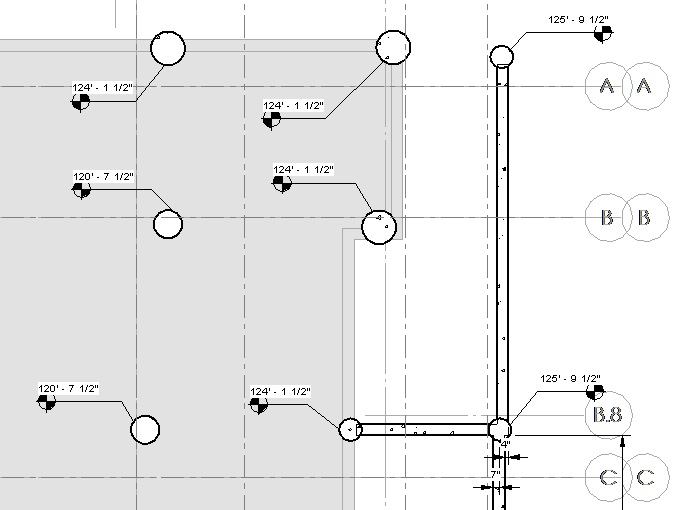
They didn’t have to look pretty, because they’ll never appear on paper. I like to think of working views as the digital equivalent of scratch paper. You can scribble all you want, knowing you won’t mess up your sheet. And if you decide later that you do need some of those annotations or sections on the plotting sheet, you can easily copy the annotations or change the section back to a regular type.

Watch out for real objects

The one caveat I would give for working views is that if you change something real, like a wall or a door, you’d better go back and check that in your plotting view to make sure it still looks the way you want it to. Real annotations such as dimensions and spot elevations should follow their hosts, but detail components might not and text notes definitely won’t.

Quick Rotate Objects

01 Monday Apr 2013

Posted by Kate in Basics, Tips & Tricks

≈ Leave a comment

Tags

Columns, Revit, Rotate, Tips & Tricks

When you’re inserting objects or components into a Revit view, you may have noticed the “Rotate after placement” checkbox below the ribbon.QuickRotate1

It’s handy, I suppose, but personally, I haven’t used it since I discovered the quick-and-easy way to rotate objects before you place them: with the space bar.

By default, pressing the space bar before you place an object rotates it 90 degrees.

QuickRotate2 QuickRotate3

But if you hover over an existing object first, your new component will rotate to match its alignment.

QuickRotate4 QuickRotate5 QuickRotate6

I use this ALL the time for placing breaklines along braces and sloped beams, or to align columns with non-orthogonal grids.

Just a quick tip to tide you over while we wait for Revit 2014 to appear…

Keep Properties active

14 Thursday Mar 2013

Posted by Kate in Basics

≈ Leave a comment

Tags

Properties, Revit

Okay, some of you might laugh at this tip, it’s so simple. But it took me a little while to figure it out, and I saw somebody else get tripped up by it just last night, so I know it’s not just me.

Ready? Here it is:

The Revit Properties palette is only active while your cursor is over it.

Simple, right? But this happened several times a day until I caught on: Select an object to modify. Click on a field in Properties. Move the mouse out of the way. Press Delete to erase the current value. Realize the object disappeared instead. Mutter at the screen. Undo. Repeat.

The explanation for this is that Revit tracks the position of your cursor to determine whether the Properties palette is active. Moving the cursor off the palette has the same effect as clicking Apply — sometimes it’s even faster than using Apply.

Now that I know this, I’m more strategic with my cursor placement. I’ll move it up or down to get it out of the way of the field I’m editing, instead of left or right. When I’m finished, a quick flick to the side applies the changes. (I also made the palette a bit bigger, to give myself more room to move.)

For me, this falls under the category of “small but significant” features: easy to explain and use, but no less valuable for their simplicity. I’m sure there will be plenty more of these features in posts to come!

When is a line not a line?

15 Friday Feb 2013

Posted by Kate in Basics

≈ Leave a comment

Tags

Components, Details, Objects, Revit, Styles

When is a line not a line? When it’s an object!

That sounds like either an annoying riddle or a really bad joke, but when it comes to details in Revit, it’s just the truth.

When we’re working with 2D views in Revit, they’re often a combination of live objects (e.g. beams/walls/floors), detail components (e.g. break lines, miscellaneous framing, rebar), and detail lines. I know there are some people out there who advocate against the use of detail lines at all, but we’re not able to do without them completely yet.

However, the distinction between detail lines & components confused me for a while. Specifically, why weren’t the line styles in my project the same ones I saw when editing a detail component?

DetailLines

DetailComponents

In hindsight, the pull-down headings (“Line Style” vs. “Subcategory”) should have tipped me off. But a lot of the names were the same, so I’d get confused when I’d see something in one place and not in the other.

DetailVGTurns out that Detail Lines — which only exist in projects — are considered “lines” and are controlled by that category in the Visibility Graphics dialog. “Lines” in Detail Components — which exist only in families — are considered “objects” and are controlled under the “Detail Items” category of Visibility Graphics.

In our office, there’s a lot of overlap between the styles in each category, which makes sense given that they both serve a similar purpose of adding 2D geometry to sections and details. But it also helps explain why I overlooked the differences!

I think the thing I find most confusing about Revit is the multiple terms for very similar objects. Things that might be synonyms in daily life have very different meanings inside Revit.

At any rate, that’s one minor mystery cleared up. On to the next!

Recent Posts

  • First theme of AU2016? Connectivity
  • BIM Essentials Tip #3
  • RTC and AU and BIMThoughts, oh my!
  • Revit 2017!
  • AU2015, Day 3

Archives

  • November 2016
  • July 2016
  • April 2016
  • December 2015
  • November 2015
  • October 2015
  • July 2015
  • June 2015
  • May 2014
  • September 2013
  • August 2013
  • July 2013
  • May 2013
  • April 2013
  • March 2013
  • February 2013
  • January 2013

Categories

  • Analysis
  • Announcements
  • Autodesk University
  • Basics
  • BIM Essentials
  • Framing
  • IT
  • Podcasts
  • RTC
  • Standards
  • Thoughts
  • Tips & Tricks
  • Uncategorized
  • Views

Enter your email address to receive notifications of new posts by email.

 Subscribe in a reader

Create a free website or blog at WordPress.com.

Privacy & Cookies: This site uses cookies. By continuing to use this website, you agree to their use.
To find out more, including how to control cookies, see here: Cookie Policy
  • Follow Following
    • BIMmuse
    • Already have a WordPress.com account? Log in now.
    • BIMmuse
    • Customize
    • Follow Following
    • Sign up
    • Log in
    • Report this content
    • View site in Reader
    • Manage subscriptions
    • Collapse this bar
 

Loading Comments...